Hey folks — from the record label that’s been making a reputation for itself over the past several years for your go-to spot for crazy experimental noisy sounds and truly unique merch options, perhaps we should have seen this one coming, but the latest Philip K. Discs release is here… and it’s a hand-built, fully customizable, fully modular, noise box you can use to make your OWN crazy experimental noisy sounds!
My label, Philip K. Discs, has always been dedicated to putting out noisy, experimental albums. This year, I decided to place the creativity into your hands, with a noise box that you can use to make your own chaos.
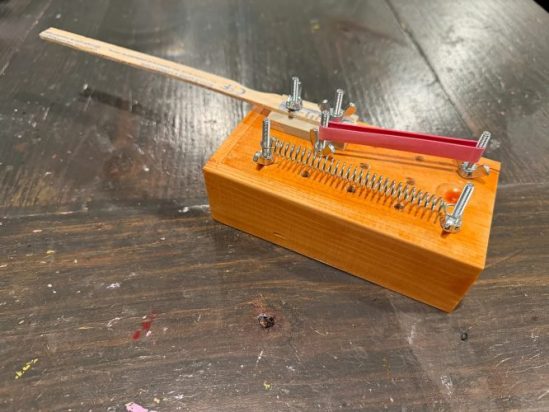
Introducing The Haunt, the first Philip K. Discs release of 2026. The Haunt is a modular noise box, ready to be plugged straight into your amp or run through your pedalboard. It’s perfect for beginners or seasoned experimental artists. It comes with all the implements and sound tools shown in the photo above, with inputs and space for you to add your own.
Here’s how it sounds running direct into an amp:
And here are some samples running it through my pedalboard (Fuzzrocious, Dirge, and Dwarfcraft pedals):
If you’re interested in scoring one, be aware that this initial run is limited to seven. You can grab it here. I can’t wait to see what y’all create with it.
As mentioned in the demo video, The Haunt is a wooden box with a built-in piezoelectronic pickup mic and 1/4″ output jack, plus a series of holes on the outside of the box where you can attach various noise-creating objects (including the spring, rubber band, and wooden stick that come with it or anything else you can dream up). The resulting sound can be sent straight into an amp or through any chain of effects you may have lying around. And as Jeremy said in his Substack signoff, I too will be interested in hearing whatever innovative sounds come out of whoever snatches up one of these custom creations…
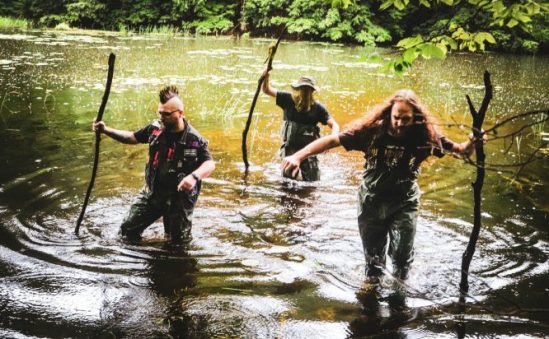
Feels like a good time to check in on our Michiganian friends Bog Wizard. Back when we published a review of their 2020 and 2021 releases, there were a few specific references to the “Satanic Panic” of the late 20th century. Well, since that time, the band went and released a whole damn album named for that concept. They also put together an album with literary tie-ins, both of which are highly recommended for you to check out!
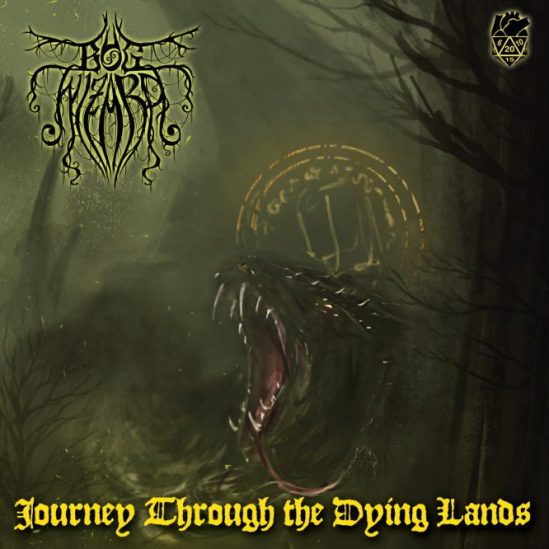
Bog Wizard – Journey Through the Dying Lands (self-released in collaboration with Madness Hearts Games, 25 October 2024)
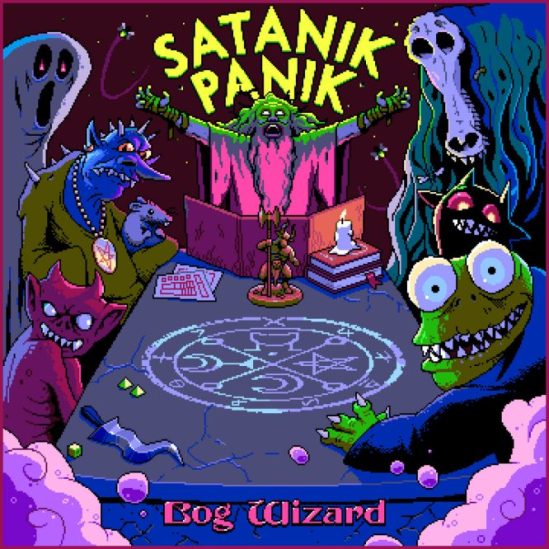
Bog Wizard – Satanik Panik (self-released, 31 October 2025)
2024’s Journey Through the Dying Lands started its life with the mammoth (practically twenty-minute) opening track “I, Mycelium” which is based on drummer Harlen Linke‘s short story of the same name (starring the Bog Wizard character). Admittedly, it was on the strength of this song — and specifically the ultra-catchy and repetitive slow groove that underpins large swaths of it, alternating with crunchy doom riffs — that pushed the album into my list of 2024’s best releases. One of those cases where upon first listen it absolutely grabs your brain through the ear-holes and refuses to let up the whole way through.
The band has offered up two other new tracks here (one in their familiar psychedelic-doom idiom, the other acoustic with haunting choral-style vocals), each relating to other stories in the Journey Through the Dying Lands anthology book that also features “I, Mycelium,” and rounding things out are live versions of two songs from 2021’s Miasmic Purple Smoke, “recorded in front of a live audience of nerds at their local game store, Epic Tabletop Hobbies out of Grand Haven, Michigan.”
On Halloween last year, the band dropped their latest, Satanik Panik, which quickly clawed its way onto my year-end-list for that year as well, on the basis of its excellent Epicus Doomicus Metallicus compositions. Like the rest of Bog Wizard‘s catalog, this is set against a backdrop of bugs and birds and other natural sounds that would be found in a swamp, and intermixed with influences of psychedelia and dark blues. Also like the rest of the band’s material, the subject matter tends towards the occult and fantastic: outside of the title track with its chants of “Satan, Satan!” the songs here are generally filled with references to golems and goblins, dragons and necromancers, and other such nerdily topics.
Speaking of nerdy stuff: the album concludes with a bass-heavy distorted-blues-rock cover of “Toxic Love,” the original version of which, as some late-80s and early-90s kids will recall, was sung by Tim Curry as his character Hexxus (the evil spirit of destruction) in the environmental and conservartion-themed film FernGully: The Last Rainforest. With its lyrical mentions of sludge and slime and muck, this fits perfectly with the rest of the album.
* * *
Find Journey on vinyl/CD here or digitally here; grab an autographed copy of the affiliated book here (also available in Kindle edition here).
Panik is on vinyl or CD here, or the digital version here.
Also be sure to check out the band’s Bigcartel store for some exclusive goodies you can’t get on Bandcamp, including this nifty wooden dice box!
[Editor’s Note: I asked Antony to detail the process by which he created his interactive crime novel, Can You Solve The Murder?, which required some specific tools and a lot of intricate planning. And of course this article contains no spoilers for the book or any of Antony’s work.—J.S.]
I’m an author, primarily writing crime and thriller novels. I’m best known for the Cold War spy movie Atomic Blonde, which was based on my graphic novel. I also write the Dog Sitter Detective murder mysteries, the Brigitte Sharp spy thrillers, and most recently the interactive novel Can You Solve the Murder?
Hang on — an interactive novel? That’s right. You see, in addition to all the above, I also write video games. I grew up loving both books and games of all kinds, and was fortunate (read: old) enough to have been a young boy when the original Choose Your Own Adventure, Fighting Fantasy, and Lone Wolf books were first published.
Branching Out
Those series are examples of what came to be called ‘gamebooks’, because they’re both forms smushed into one; books where the reader plays an active part, directing the story by making choices, like playing a game. (These days we sometimes get fancy and call them ‘interactive novels’.) This is achieved by dividing the story into numbered sections and sending you to read different sections depending on your choices.
If you’ve ever played a text adventure game on a computer…
…Then you’ve essentially played a gamebook, just with all the page-flipping done for you by the computer. The modern ‘Visual novel’ form is basically the same thing, too.
We call these types of story a branching narrative, because the choice map often looks like a tree, with each new section branching off into further choices.
Simplistic example of a branching narrative.
At their heart, all video games are essentially branching interactive experiences. You make a choice — whether in text, or with a joystick, or by pressing an action button — and something happens in the game reflecting that choice. The presentation of those choices, and the results, is nowadays enormously more sophisticated and complex than it was in a 1980s text adventure. But at their core, all games are about players making choices and the system reacting to them.
Back in the late ’70s & ’80s, computer games looked very much like that screenshot above. They weren’t the interactive movies with ultra-realistic graphics, hours of cinematic music, and dialogue voiced by professional actors to which we’ve become accustomed. Instead, they were basic, often poorly-written, and any graphics were extremely primitive. Those early limitations allowed gamebooks to thrive. They were almost always better-written than computer games, with richer and more evocative text, and were also often illustrated by professional artists.
As video game technology accelerated, though, and digital interactive experiences became ever more realistic and immersive, gamebooks fell out of fashion. They became a curio, remembered with nostalgia by enthusiasts but largely forgotten by the mainstream.
I was one of those enthusiasts from the very start. In fact, I was so taken with gamebooks that eleven-year-old me even had a go at creating one of my own, written on a manual typewriter and illustrated with a ballpoint pen, which I then made my friends play. Sadly, the ambitiously-titled Hellfire of Death’s Caverns is lost to the mists of time, but looking back, it certainly explains a lot about my career.
You see, a love of gamebooks introduced me to early role-playing games and fantasy board games, which in turn led to an interest in game design… which ultimately led to me working in videogames as a writer and narrative designer. That career has run in parallel with my fiction writing for the past twenty years1, and more recently I’ve also established myself as an award-winning crime author.
Charting a Course
I love writing and plotting crime and mystery fiction. I love writing and designing games. So I kept wondering: was there some way to combine the two?
That’s when I remembered the many hours I spent as a boy with my head buried in gamebooks. Was it possible to write a crime story in that format? How would I handle clues, red herrings, and all the other elements that people love about murder mysteries?
And how on earth do you plan a book like that, anyway?
While answers to many of those questions would take months of work to figure out, the last — how do you plan a gamebook? — was one to which I already knew the answer thanks to that early typewritten effort, and my later experience in game design: you build a huge flowchart.
The original gamebook authors drew their charts and maps by hand, on taped-together pieces of paper, with markers. If you’ve ever mapped a text adventure game in a notebook as you played, you were effectively doing the same thing in reverse.
Nowadays, though, we have better tools. Digital tools. Surely one of them would be better suited to making such a flowchart. But which one?
There are quite a few apps and services out there with which to build flowcharts. I was already familiar with Miro, an online service used by many game designers for brainstorming and building ‘paper prototypes’ (while there’s no paper involved these days, the name has stuck). I used Miro to plan a couple of proof-of-concept interactive short stories, which I wrote to get a handle on the format and test whether I could make it work.
A flowchart for a branching narrative short story. That tangle in the bottom left shows why fine-tuned control over directional arrows is essential.
I could, and friends to whom I sent the prototypes enjoyed them, so I began planning a book-length mystery.
But Miro is a subscription service, with only a small number of ‘boards’ available to free accounts. I was already at my limit, and reluctant to subscribe — believe me when I tell you that very few authors actually make a living writing novels! So I put aside the decision of what to use for a moment and focused on pitching the book itself. After all, if it didn’t sell, there’d be no need to build charts.
I needn’t have worried. Can You Solve the Murder?2 went to a bidding war, and was eventually acquired by Transworld in a two-book deal with a frighteningly short deadline. The matter of choosing a flowcharting tool had now become rather urgent.
My criteria were simple, but specific. I wanted to:
Lay out the chart in a freeform manner, rather than being forced into a grid, with no limit on size or dimensions
But have the option to snap-align objects to one another
Draw arrows that snap to destination objects with auto-applied directional heads, and that can be moved and modified freely later
Easily apply text labels to arrows that represent a choice (most do, but not all) and have those labels move with the arrows when modified
Draw multiple such arrows coming from a single object
Have multiple arrows also arriving at a single object
Mix object shapes, and be able to easily resize and re-color them however I wish
Write text directly into any object, and have the text be easy to modify: size, color, style, etc
Overlay shapes on top of one another (in order to track section numbers and clues discovered)
Finally, I needed it to feel intuitive and simple to use. While that’s not really a quantifiable metric, it was important to me. I knew I’d be spending many, many hours making and using these charts. As a former graphic designer, not to mention lifelong Mac user, I want my tools to get out of the way and let me work, not make me wrestle them into submission.
I spent the next couple of weeks trialling many different charting apps and web services. I won’t go into detail on them, but suffice to say that while several had the features I was looking for, none of them felt particularly easy or intuitive to use…
Return to #1 and Try Again
…Except Miro, to which I kept returning. So I sucked it up and used part of my book advance to pay for a subscription.
Ultimately, the best tool had to win out. I’m a big believer that using inferior tools simply isn’t worth the hassle and frustration they cause, no matter how cheap they may be, and while Miro still isn’t perfect (it doesn’t do per-character text sizing, and object color modification could be better), it remains the tool best suited to how I build gamebook flowcharts. In some ways, using Miro reminds me of a good vector design app, like the venerable Aldus FreeHand3 or modern Affinity Designer, with an ease to its interface and UI that at times becomes almost invisible (the highest compliment I can pay an interface).
So, how do I use all those features I mentioned to build a gamebook flowchart? Well, let’s take a look.
Only five colors, sorry.
Colors: Green boxes represent ‘core story’ sections, which all readers will see, while yellow boxes are sections that will only be seen by readers who make particular choices. Blue boxes are ‘ghost’ sections — they don’t exist in the book, but here they note where a choice will send you to a different part of the chart. Dark green boxes are good endings, while black boxes are — you guessed it — bad endings that require you to return to #1 and try again.
Pet the dog, be rewarded. If only real life were so simple.
Overlaid objects: Each main colored box has a numbered red circle overlaid on it at top-right — this is the number of that section in the book, to which you flip when directed. Some boxes also have a blue circle bottom-right for Clue Numbers, which I’ll explain below.
Text inside any object: In addition to text in the main boxes, the number codes in those red and blue circles are contained directly within the object, rather than being a separate text box placed on top and grouped. This sounds like a small thing, but it makes them much easier to manipulate, edit, and move around the board, and when you’re dealing with literally hundreds of these objects, it makes a big difference.
Grid alignment: Although most of the boxes are aligned with one another by choice, note that section #52 is not. This tangle demonstrates the value of not being forced into a grid:
Freeform arrows: Many boxes have multiple arrows branching out of them, and #46 even has multiple arrows branching into it. That’s an essential requirement. Again, that tangle reinforces the need for fine control over arrows.
Arrow labels: These show which section a choice (or conditional: see below) directs you to read next.
The blue circles are part of a system I call Clue Numbers. Many sections of Can You Solve the Murder? ask the reader to write down a Clue Number. In this example, the text of section #23 would end with the instruction:
Write down D2 in your notebook, then turn to #46
Later, if you decide to keep walking and thus turn to section #9, a conditional check is made. The text of that scene would end as follows:
If you have D2 written in your notebook, turn to #32
Otherwise, turn to #58
This mechanic is vital to the success of a clue-based mystery like Can You Solve the Murder? because it effectively allows the book to ‘remember’ your choices, and the information you’ve gathered, throughout the story — but does so in a way that doesn’t give the game away, because the reader doesn’t know what those codes mean. (I do, of course, and track them all in a spreadsheet).
It’s impossible to complete Can You Solve the Murder? without using Clue Numbers. Thus, it’s vital that I can easily assign them to the appropriate sections and move them around if need be when building the book’s flowchart.
Sharing the Load
One nice element of using an online service is shareability. This was necessary for Can You Solve the Murder? because of something called ‘structural edits’. In fiction writing, this is what happens after you submit your first draft, and the editor then suggests changes such as removing/adding subplots, modifying characters, perhaps re-ordering some scenes, and so on. All these things change the structure of the book, hence the term.
Making such large-scale changes to a gamebook manuscript would be absolute hell.
Every choice in a branching narrative sets off a cascade of subsequent choices and reactions, meaning structural changes ripple downstream throughout the book. In a regular novel, revising a manuscript to remove a secondary character can often be accomplished fairly easily. In a gamebook, though, it might require re-plotting half the story, creating new sections, re-ordering existing paths… a nightmare that could take weeks or even months to untangle.
To avoid this, I gave my editors password-protected view-only access to the flowchart board, something Miro makes very easy (I could also have given them full editing access, or not required a password), and asked them to make their structural edit notes based on the flowchart. None of us had ever worked on a book like this before, and doing so required a lot of mutual trust, especially with strange requests like this! But it worked out, and part of that was down to how easy Miro makes sharing and viewing.
You can also easily export a Miro board, or part of one, to a variety of formats, including JPG, PDF, and even CSV. While I haven’t needed that facility for Can You Solve the Murder?, I use it often in my video game work.
The truth is that I barely use a fraction of Miro’s power. There are Miro wizards out there who can make it do all sorts of things: presentations, prototypes, slideshows, you name it. I’ve worked with some of them at game studios. Apparently, even the NFL’s digital team uses it to plan gameday strategy for their apps and services. Miro’s YouTube channel has many such case studies, along with tutorials.
Me? I don’t need to do any of those things, and wouldn’t know where to start. But that leads me to the final thing I like about Miro: it doesn’t force that stuff on me.
One of my favorite and most-used apps is the writing software Scrivener, which I’ve used since it first launched in 2007. (I’m writing this very article in it.) A common refrain amongst its advocates is that most people only use 20% of Scrivener’s features… but we all use a different 20%. Miro feels very much the same.4
Choose Your Own Learning
I expect most of you reading this aren’t writing interactive novels. But you might need to create charts or diagrams of some kind, and if so, I recommend Miro. Yes, there are free alternatives out there, but I haven’t found any that are as flexible and intuitive to use.
As for the book, Can You Solve the Murder? was published in summer 2025 and quickly became my best-selling novel ever. A sequel, The Forest of Death, is due this year… and yes, I used Miro again to build its flowchart.
My first game was the original Dead Space, on which I started work in 2006. Since then, I’ve written titles like Resident Evil Village, Dead Space Extraction, Shadow of Mordor, CSR Racing (which was featured in an Apple keynote!), Binary Domain, and many more. ↩
As part of promoting the book, I also designed an interactive live event in which the audience must solve a (different) murder. You can hear me host one such scenario on an episode of The Incomparable’s Game Show podcast. ↩
To this day, I still mourn the passing of FreeHand. ↩
One friend who saw an image of my flowcharts asked if I was using Twine, which is an interactive fiction tool that allows you to write branching narrative charts and then export the result as a playable game. People have made amazing, complex games in Twine, and I sometimes use it myself for proof-of-concept work (such as testing a game’s romance system, or checking dialogue tree logic). But Twine’s interface is often frustrating and slow, and it wouldn’t allow me to do even half of the things I set out in my criteria list. ↩
Cumbia rebajada was born by accident in the 1990s, when Monterrey DJ Gabriel Dueñez’s turntable overheated at a party and began to play cumbria music at half-speed. Instead of clearing the floor, the strange new music rejuvenated those in attendance; soon after that, the artist began circulating a series of mixtapes that celebrated this disorienting experience. Enter Debit (Delia Beatriz), who grew up listening to this music in Monterrey and who now resides in New York. Taking Dueñez’ cassettes as a starting point – although these tapes themselves are constructed from older music – she has now produced what amounts to a mix tape of a mix tape of a mix tape, an oblique commentary on culture and time.
At times, Desaceleradas leans on hauntological timbres, which seems appropriate given both the ancestral reverence of the region and the fact that many of the original performers have passed on. They speak here through snippets that those familiar with the original music may be able to identify, but one can also imagine them whispering through EMF, using abraded grooves and fraying tapes as spiritual conduits. If one revives the voices of the dead, are the dead alive again? Or have they always been present?
The tapes have been decelerated so that they can be examined from a new angle, appreciated in a different way. It is hard to imagine dancing to Debit’s music, save perhaps as a ghost, disembodied, unmoored from time. Some of Dueñez’ music is replayed on accordion, while other segments are “re-voiced” through synth. One might call such recordings paraphrases, although their communal impact is greater than that of any individual piece. Yes, there is a single, but we can’t imagine it being played before midnight. For the first time on the album, clear voices cut through the static. In “Soindo Deuflez” the bass begins to reverberate; one can intuit what the original dancers were responding to without having the urge to respond in turn.
When synth dissolves into a dark cloud of drone on “El Puenta del papa,” one thinks of the ways in which history is often erased as those in power co-opt the narrative. From rewritten textbooks to the disappeared, people and stories vanish, leaving a palimpsest. Debit flips the script, amplifying the voice of what has been effaced even as she adds new layers. “Rebajadas” seems to refer to the discounted, but the fact that this piece exists suggests the opposite, a spectral choir seeming to sing through the hiss. In re-excavating the past, Debut repurposes some of the music’s original power, viewing it through her own distinctive lens. (Richard Allen)
One of the best features of “Halloween Kills” (2021) is the collection of flashback sequences which show the rest of the night Michael Myers came home to terrify Haddonfield, a continuation of the events from the original “Halloween” (1978). “Kills” depicts a completely different course of events that were shown in “Halloween II” (1981).
In “Halloween II”, Michael continued his rampage on that night in 1978. In “Halloween Kills”, Michael is captured after a brief encounter with police, and with Lonnie, a Haddonfield kid. Michael retreats to the old Myers house, thereby setting up the alternate timeline.
I thought it would be fun to edit together a seamless version of that night into a re-edit called “Halloween: The Night of Terror Ends”, a short film that respects the alternate timeline of the latest trilogy. It turned out to be a very exciting editing exercise that took up far more time than I originally thought it might. And because I wanted to make it seamless, I spent a great deal of time with music and sound effects editing, including recording some of my own sound effects.
Some observations and facts about this silly project:
Footage comes from “Halloween”, “Halloween II” and “Halloween Kills: Unrated”.
Music is from those three films, and also extensively from “Halloween” (2018).
There are some fun hookups with early Michael POV scenes from “Halloween II”, which help set the geography and timeline, and I thought it was fun to include more of Dr. Loomis and even a POV shot of trick-or-treaters that tied into the Lonnie scene from “Kills”!
I had to add a ton of music tracks and sound effects to help blend abrupt cuts between movies (and erase any remnants of the “Halloween II” score. I recorded some sound effects with my 14-year-old son, who “played” Michael Myers in a few takes, of him breathing, grunting (reacting to punches) and having a mask ripped off his face, with my iPhone and Voice Memos.
The most extensive sound design challenge was the capture of Michael, his beating, and attempted execution. Those scenes from “Kills” were all over the place with audio (including voiceover!), so the soundtrack in this area is almost entirely reconstructed by me.
I generously peppered in Michael Myers breathing sound effects throughout the piece because it was fun. I found some nice nighttime soundscapes that helped blend together shots, as well.
The opening titles are from “Kills” which I extracted and recolored. Just like they did in the 2018 trilogy, I added pretend gate-weave to the titles.
I’ve come to admire the flashbacks in “Kills” even more after embarking on this editing exercise (notice that Dr. Loomis’ car is still parked across the street from the Myers’ house!). The way Haddonfield was lit was dramatically different than the original film - there is a TON more atmosphere in “Kills”’ version of 1978, plus Haddonfield streets that were pitch black in the original and “II” now are fully lit as opposed to being bathed in complete darkness.
To help blend the three movies together, I had to do some color grading. The original film is pale and green, “II” is very warm and contrasty, and “Kills” is bright and blue. I settled on a warm, slightly desaturated look, and did my best to match the contrast of all three films.
Picture, music and sound editing all done in Final Cut Pro.
Graphics created in Pixelmator Pro and Adobe After Effects, and color grading was finished in After Effects.
These types of editing exercises invigorate my love of picture editing and sound effects editing. When I was a kid, I would lug our second VHS VCR near our first VCR and hook them together after I realized I could cut together shots of a movie in a different order! At that time, I couldn't possibly imagine how advanced the tools would get so that I could do something like this fun "Halloween" video at home on my personal Mac.
As Immigration and Customs Enforcement operations ramp up across the country, so has misinformation. The Onion dispels common myths surrounding ICE raids.
MYTH: ICE agents lack proper training.
FACT: Most have been racists their entire lives.
MYTH: ICE raids do nothing to reduce crime.
FACT: A fruit vendor who sold mangoes that weren’t quite ripe is now off the streets.
MYTH: ICE agents are required to identify themselves.
FACT: Most ICE agents are preverbal.
MYTH: My grandmother was deported to El Salvador.
FACT: No one really knows where she was deported to.
MYTH: ICE is violating people’s constitutional rights.
FACT: The U.S. Constitution doesn’t apply in Uganda.


.jpg)